DIY Brine Shrimp Hatchery
Preparation: These plans are an alternative to the "2 liter bottle" method of hatching brine shrimp. This method takes up less space, and is just as efficient with hatching eggs. The "2 liter bottle" method might be better if you have a fish house or need to raise enough brine shrimp for thousands of babies.
Purpose: To design a Hatchery to hatch brine shrimp (Artemia) to feed to small or newly hatched fish fry.
Tools required: Mason jar w/lid and screw on ring (wide or narrow mouthed), Air pump, flexible airline tubing, 2-3 way gang valve, hammer, screwdriver (or punch tool), Brine shrimp eggs, and Rock salt (or any non-iodized salt).
Preparation: If your mason jar is new, give it a good rinsing. If your using one previously used for canning give it a good cleaning with mild soap and water, but preferably with an Autoclave.
 Construction: First screw the lid onto the mason jar with the ring. In the center of the lid use your hammer and screwdriver (or punch tool) and make a hole roughly the size of the flexible airline tubing. I made mine a little smaller so that it was a tight fit which helped me in the placement of the tubing later on. Then on each "corner" of the lid punch a smaller hole for air to escape out of (one is probably enough, but I like it to err on the side of caution). Then cut your flexible tubing to an appropriate length to reach the gang valve. You can also just cut it to run directly into your mason jar if you are running only one jar instead of multiples, but I would recommend a gang valve anyhow to control noise and air flow. Then cut your flexible airline tubing at an appropriate length to reach down into your mason jars. You can also use stiff airline tubing in the lid going down into the mason jar, and then connect your flexible tubing to it. For ease I decided to just use flexible tubing all the way. You now have a fully functional brine shrimp hatchery, on to the hatching!
Hatching your own brine: Eggs: First thing to consider is getting good quality eggs, I prefer an egg that boasts 90% hatch rate or higher. You can buy them in small cans, but pricewise its usually cheaper to buy it in bulk and store the rest. To give you a good idea I bought a small can (pictured to the right) for 13 bucks, but at a local auction I was able to score the mega can (lifetime supply) for 15. You can also get the nice cans online at E-bay or Aquabid. As for storage, I used a mason jar (tightly sealed) and stuck it in my fridge, the remainder of the eggs that wouldnt fit in the mason jar I put in a good Ziploc back also in the fridge. You always want to store your eggs in a cool low moisture environment so the fridge is ideal.
Salt: Next get a big bag/box of salt. I use rock salt, but many others have had success with water softener salt, or any other non-iodized salt.
PH: Ideally your water needs to have a PH of 8+. If you have a lower PH you might need to add a little baking soda or Epson salt to raise the PH. My PH is naturally 8.5 so I don't have to add any.
Lighting: I don't use any external lighting when I hatch brine shrimp. Just natural room lighting and overhead lights at night.
Heating: I don't heat the water with a heater, or with a light. I keep my house around 70-74 degrees and it seems to be warned enough. I have heard that if you use heat you will get faster hatch rates, but I haven't had the need for hate rates any higher than what I already have. If you live somewhere that is constantly cold, or are hatching in a garage/unheated fish room you may want to consider a small heater or small lamp with 60 watt bulb to assist in the heating process.
Take your mason jar and fill it with regular tap water (and add buffers to raise PH if needed) up to the part on the mason jar where it starts to curve, maybe a little below that point. At this point you want to add the salt. I usually add 3 teaspoons of salt per mason jar. There are numerous thoughts on what the salinity should be, go with what works best for you. After adding the salt I screw on the lid and turn on the air pump. After the salt has dissolved I remove the lid and add my eggs. I wouldn't recommend adding more than 1/2 teaspoon per mason jar. You can, but it will probably decrease the hatch rate a little bit. The amount you use will highly depend on how many fish you are needing to feed. As an example I am feeding around 80-100 baby calvus 3 times a day, and 1/8-1/4 tsp works well for me and usually end up throwing away alot of brine that could have been fed. After you add the eggs swish the jar a little bit to make sure that no eggs get stuck to the sides out of the water. Now just wait 12-18 hours (depending on temperature) and you should have some hatched brine.
Harvesting: After around 18 hours I turn off the airpump and let the water settle for 5 minutes or so. If your salinity is correct all of the hatched eggs will float to the top, and most of the unhatched eggs will either be near the top or lingering in the middle. At the very bottom is where all your hatched baby brine should be residing. If you look really close you can see a little pink cloud squiggling around. If you are getting a lot of eggs at the bottom of the mason jar try increasing your salt. Then I remove the lid and take a turkey baster and slowly put it into the bottom of the jar (so as to not stir in the egg shells with the fry) and suck out as many baby brine as I think I will need. The more dense the brine is at the bottom the less you will need to suck out.
To rinse or not to rinse: After you harvest your brine the next question is whether you should rise them before feeding them to your babies or not. My philosophy is that it never hurts to rinse things off that are going into a tank, especially a fry tank. That being said, I squirt my brine directly into my tanks without rinsing them and I have never had a problem. I add salt to all my normal tanks to help with disease, so adding the salty brine doesn't seem to be hurting, I just don't add normal salt when I do water changed on fry tanks. If you choose to rinse them, alot of people use either baby brine shrimp nets, or coffee filters. The main reason I don't do these is because brine nets usually let alot of the younger brine through and they get thrown away, also coffee filters can take a while to drain. If you are rinsing them, just do so under cold water, and then feed them to your brine.
Shelf life: Another important thing is how long to keep the brine going before starting a new batch. After my first hatch (around 18 hours after I started) I will usually wait 36 hours and then dump the water and brine and start a new batch. Completely rinsing out the mason jar with just water and some violent shaking. Then I start the process over again. I use a 2 mason jar setup, and it keeps fresh brine at my fingertips all the time. If you need more you can use a 3 jar system and it should provide more.
I hope this article helps you with feeding your babies with fresh brine!
After you decide which method you prefer to attach the 3/16 tubing you are done. Attach airline tubing to the 3/16 plastic tubing and control the pump output with a gang valve to adjust your tumble rate. Just open the black endcap so you can place the eggs inside the egg chamber and you are ready to tumble.
Catching Your Fish - DIY Fish Trap
Purpose: To design a Hatchery to hatch brine shrimp (Artemia)
to feed to small or newly hatched fish fry.Tools required: Mason jar w/lid and screw on ring (wide or narrow mouthed), Air pump, flexible airline tubing, 2-3 way gang valve, hammer, screwdriver (or punch tool), Brine shrimp eggs, and Rock salt (or any non-iodized salt).
Preparation: If your mason jar is new, give it a good rinsing. If your using one previously used for canning give it a good cleaning with mild soap and water, but preferably with an Autoclave.
Construction: First screw the lid onto the mason jar with the ring. In the center of the lid use your hammer and screwdriver (or punch tool) and make a hole roughly the size of the flexible airline tubing. I made mine a little smaller so that it was a tight fit which helped me in the placement of the tubing later on. Then on each "corner" of the lid punch a smaller hole for air to escape out of (one is probably enough, but I like it to err on the side of caution). Then cut your flexible tubing to an appropriate length to reach the gang valve. You can also just cut it to run directly into your mason jar if you are running only one jar instead of multiples, but I would recommend a gang valve anyhow to control noise and air flow. Then cut your flexible airline tubing at an appropriate length to reach down into your mason jars. You can also use stiff airline tubing in the lid going down into the mason jar, and then connect your flexible tubing to it. For ease I decided to just use flexible tubing all the way. You now have a fully functional brine shrimp hatchery, on to the hatching!Hatching your own brine: Eggs: First thing to consider is getting good quality eggs, I prefer an egg that boasts 90% hatch rate or higher. You can buy them in small cans, but pricewise its usually cheaper to buy it in bulk and store the rest. To give you a good idea I bought a small can (pictured to the right) for 13 bucks, but at a local auction I was able to
score the mega can (lifetime supply) for 15. You can also get the nice cans online at E-bay or Aquabid. As for storage, I used a mason jar (tightly sealed) and stuck it in my fridge, the remainder of the eggs that wouldnt fit in the mason jar I put in a good Ziploc back also in the fridge. You always want to store your eggs in a cool low moisture environment so the fridge is ideal. Salt: Next get a big bag/box of salt. I use rock salt, but many others have had success with water softener salt, or any other non-iodized salt.
PH: Ideally your water needs to have a PH of 8+. If you have a lower PH you might need to add a little baking soda or Epson salt to raise the PH. My PH is naturally 8.5 so I don't have to add any.
Lighting: I don't use any external lighting when I hatch brine shrimp. Just natural room lighting and overhead lights at night.
Heating: I don't heat the water with a heater, or with a light. I keep my house around 70-74 degrees and it seems to be warned enough. I have heard that if you use heat you will get faster hatch rates, but I haven't had the need for hate rates any higher than what I already have. If you live somewhere that is constantly cold, or are hatching in a garage/unheated fish room you may want to consider a small heater or small lamp with 60 watt bulb to assist in the heating process.
Take your mason jar and fill it with regular tap water (and add buffers to raise PH if needed) up to the part on the mason jar where it starts to curve, maybe a little below that point. At this point you want to add the salt. I usually add 3 teaspoons of salt per mason jar. There are numerous thoughts on what the salinity should be, go with what works best for you. After adding the salt I screw on the lid and turn on the air pump. After the salt has dissolved I remove the lid and add my eggs. I wouldn't recommend adding more than 1/2 teaspoon per mason jar. You can, but it will probably decrease the hatch rate a little bit. The amount you use will highly depend on how many fish you are needing to feed. As an example I am feeding around 80-100 baby calvus 3 times a day, and 1/8-1/4 tsp works well for me and usually end up throwing away alot of brine that could have been fed. After you add the eggs swish the jar a little bit to make sure that no eggs get stuck to the sides out of the water. Now just wait 12-18 hours (depending on temperature) and you should have some hatched brine.
Harvesting: After around 18 hours I turn off the airpump and let the water settle for 5 minutes or so. If your salinity is correct all of the hatched eggs will float to the top, and most of the unhatched eggs will either be near the top or lingering in the middle. At the very bottom is where all your hatched baby brine should be residing. If you look really close you can see a little pink cloud squiggling around. If you are getting a lot of eggs at the bottom of the mason jar try increasing your salt. Then I remove the lid and take a turkey baster and slowly put it into the bottom of the jar (so as to not stir in the egg shells with the fry) and suck out as many baby brine as I think I will need. The more dense the brine is at the bottom the less you will need to suck out.
 |  | |
Extracting the hatched brine with a turkey baster. | Closeup: Circled in Red are the hatched shells. Circled in Blue are the brine. |
To rinse or not to rinse: After you harvest your brine the next question is whether you should rise them before feeding them to your babies or not. My philosophy is that it never hurts to rinse things off that are going into a tank, especially a fry tank. That being said, I squirt my brine directly into my tanks without rinsing them and I have never had a problem. I add salt to all my normal tanks to help with disease, so adding the salty brine doesn't seem to be hurting, I just don't add normal salt when I do water changed on fry tanks. If you choose to rinse them, alot of people use either baby brine shrimp nets, or coffee filters. The main reason I don't do these is because brine nets usually let alot of the younger brine through and they get thrown away, also coffee filters can take a while to drain. If you are rinsing them, just do so under cold water, and then feed them to your brine.
Shelf life: Another important thing is how long to keep the brine going before starting a new batch. After my first hatch (around 18 hours after I started) I will usually wait 36 hours and then dump the water and brine and start a new batch. Completely rinsing out the mason jar with just water and some violent shaking. Then I start the process over again. I use a 2 mason jar setup, and it keeps fresh brine at my fingertips all the time. If you need more you can use a 3 jar system and it should provide more.
I hope this article helps you with feeding your babies with fresh brine!
Egg Tumbler
I want to start off by crediting Jay Smith, Ted Judy and Dale R. Grover. They are the ones to thank for inventing and contributing to this design. I am in no way trying to steal their design or knowledge. I am also not making any kind of profit by writing this article. I built the tumbler with some of my own design and it works great. I decided to share it with all of you in case anyone wants a cheap, homemade egg tumbler.
I built this tumbler for 15 dollars. The parts you will need are as follows:
- A Hydro-Sponge I filter for 10 gallon tanks made by Aquarium Technology Incorporated-NO. HS910
- A pack of LEE's Carbon Cartridges for Fish Bowl or Fritz Bowl Filters-Cat.NO. 13028
- A 3-inch long piece of 3/8-inch inside diameter clear, plastic tubing
- A piece of 3/16-inch thinwall inside diameter clear, plastic tubing cut the length you desire for your airline to plug into.
 |
The first thing you want to do is get rid of the base extension on The Hydro-Sponge I, but put back the weighted base. Cut the lift tube on The Hydro-Sponge I to 3 inches tall. Now take a LEE's Carbon Cartridge and pull the black end cap off so you can dump out the charcoal and filter floss inside of it. This is going to become the egg chamber. Rinse the cartridge out and put the black endcap back on. Place the egg chamber tapered side down into the lift tube of the Hydro-Sponge I. You can then take the 3 inch piece of 3/8 inch diameter tubing and stick it into the black endcap of the egg chamber. This forms the lift tube for the egg chamber. Now place a piece of 3/16 inch thinwall plastic tubing inside the 3/8 inch tubing for your airline to attach to. As far as the tumbler goes you are finished!! For those who rather make the airline tubing attached to the 3/8 tubing; you can drill or melt a hole into the 3/8 tubing for the 3/16 to fit into. Make the hole just above the black endcap of the egg chamber. Once you get the hole correct for the 3/16 tubing to fit into, you can heat the 3/16 tubing and bend it the shape you want it. Now attach it to the sides of the 3/8 tubing with a hot glue gun, a solvent or glue that is non-toxic to fish. Be careful if you heat the tubing because it bends really fast. |
 |  |
After you decide which method you prefer to attach the 3/16 tubing you are done. Attach airline tubing to the 3/16 plastic tubing and control the pump output with a gang valve to adjust your tumble rate. Just open the black endcap so you can place the eggs inside the egg chamber and you are ready to tumble.
As all aquarists know, there will come a time when you will have to remove at least one fish from your tank for one reason or another. Whether it's illness, injury, a holding female or just a nasty fish that you want to return to your local fish store, you will find yourself staring blankly at your tank, asking yourself one question... "How the heck am I going to get that fish out of there?".
There are several methods and tricks and I will go over a few of them in this article.
The smaller the tank, the easier it is to corner and net a fish. The less rockwork there is in the tank the better. However if you find yourself trying to catch that one elusive fish in a 55, 75, 125 or 250 gallon tank with more than 100 pounds of rocks, it can seem like a daunting, perhaps impossible feat. So... what is there to do?
The first and most involved process is to remove all the rocks and chase the fish with a net. The bigger the net, the better. It may even work better to use two nets to sandwich the fish between them. This method is always successful but can be very time consuming and very stressful to the other fish in the tank and I use it only as a last resort.
It's always better to try and catch a fish at night. They are lethargic and slow. This makes it easier to scoop up a fish floating in the open. However, it's hard to see and not always successful.
Another method is to put food in a net and coax them to swim into the net. Sometimes leaving the net in the tank for a few hours and then putting in food helps them to get used it being in the tank. This will usually work on most juveniles but I've found the older a fish gets, the smarter he gets and it won't take them long to catch on to this trick.
Perhaps one of the best ways to catch a fish, especially juveniles, without disturbing any decorations or stressing out the other fish is the Cichlid Trap. They are quick, easy and you probably have the materials in your house to build one right now.
Take a plastic 2 litre pop bottle, clean it out and cut off the label. Cut off the spout so that there is a hole big enough for the fish to comfortably fit through. Cut the top of the bottle off about 1/2" below where the top of the label was.
You now have a plastic cylinder with a bottom and a funnel shaped piece. Insert the funnel piece inverted into the cylinder so that it's  snug.
snug.
snug.You should look have something that looks like this:
Place some sinking pellets or crumble in the bottom and gently place it on its side at the bottom of the tank. The way this works is that the fish can easily swim in because their is no impeding protrusions through the funnel into the bottle. In other words, the funnel "guides" them into the bottle. Once they're in there and they are content eating the food, reach in and take out the bottle covering the top with your hand. When they try to swim out they can't decipher the opening clearly and panic. They're trapped and swim furiously trying to get out.
Here's some photos to better illustrate:
 |  | |
| Two pieces | Assembled | |
 |  | |
| Patiently waiting... | Gotcha! | |
This method is not without its flaws. First of all, you don't get to choose the fish you want to catch. That's up to them. If you're persistant, sooner or later the fish you want will fall victim to the Cichlid Trap. Also, holding females won't eat and this method doesn't work for them. You're better off trying one of the earlier mentioned methods in this case.
Another flaw is that your fish may become wise to the trick if it's used often. This is the method I use first to hopefully save myself the trouble of pulling apart my tank and stressing out my fish.
Shell-dwellers and their fry can be impossible to coax out of the safety of their shells. Another trap that can be easily built is the Shellie Trap. This trap not only gets the shellies out of their shells but also seperates the fry from mom.
The tube is used for curling hair and can usually be found at any hair care store. It's about 1.5" in diameter.
 Silicone the tube to a piece of ceramic tile, place it in the tank you want the fry in and place the shell on top with the opening facing down into the tube. Shell-dwellers will only come out if the shell is underwater and suspended upside-down. The fish will swim down into the tube and any fry will swim out through the holes, trapping mom for replacement back to the main tank! (A special thanks to Neil Burgess of The African Fish Zone for this one.)
DIY Yeast-Generated CO2 System
Carbon dioxide injection certainly is not necessary for all planted aquaria. You can have a beautiful planted aquarium without CO2, most likely if you limit yourself to a slow-growth setup, with less demanding plants and less fertilization. However, if you want to grow a wide variety of plants and have vigorous growth, you need higher light levels, adequate nutrients, and supplemental CO2.
Here is how a cheap Do-It-Yourself Yeast-Generated CO2 System can be constructed.
 |
- Drill a hole in the middle of the cap of a 2-liter softdrink bottle* slightly smaller than the diameter of a 3/16" air hose tube. Insert the tubing through the hole so that about 2 cm (or 1") is inside the bottle when re-capped. Cut the tube at a 45-degree angle (see picture) so that any water that gets onto the tube will drip back down more easily. Seal the insertion point with silicone caulk on both sides of the cap (the inside seal will be more important, due to the CO2 pressure which will be generated, so be generous with the caulk there).
- Run the CO2 hose into the aquarium, through a one-way check valve, and terminating in an airstone in the aquarium. Leaving an air hose unattached at both ends, with one end in the aquarium, is an invitation to disaster. It is very easy for siphoning to start by accident. Capillary action draws aquarium water up the hose to the top of the tank, then an accidental yank on the hose can easily pull the hose out enough so that this water in the hose fall below the tank water level and thus starting a siphoning action. I had 20 gallons of water on my living room floor in a few hours, started in exactly this way. Therefore I strongly recommend having a one-way check valve in the CO2 path. Note that most cheap air-hose check valves do not last very long in a CO2 line. Carbonic acid formed by the interaction of CO2 with water tends to dissolve the rubber membrane. You should spend a few more dollars and buy a check valve made for CO2. By the way, NEVER put a shutoff valve (even under control of a solenoid or timer) in the CO2 line of a yeast-generated CO2 setup. If the line is shut, the pressure will keep building until the bottle bursts--very messy.
- For the reactor, use a large-diameter plastic bottle (such as a Gatorade bottle). Cut out 3 large panels from the lower portion of the bottle. Insert the CO2 hose through a hole in one of the panes between 2 panels (see picture), near the bottom, and cap it with an airstone. Use stones to weigh the bottle down and place it in a rear corner of your aquarium. Place the water filter return spray bar vertically next to the bottle (secure to side of tank with suction cups). The idea is for the CO2 bubbles to come out of the airstone and collect at the top of the reactor bottle. The water from the spray bar then constantly agitates the CO2 surface and helps dissolve the CO2. The cap of the bottle allows it to be bled occasionally, to remove accumulated, undissolved gasses.
- Now mix the yeast, sugar and water solution as follows.
- Put 1/4 to 1/2 teaspoon of yeast into the bottle with about a cup of warm water (bread yeast is fine). Some people have theorized that champaign or wine yeast should last longer (due to its ability to tolerate the alcohol generated from the brewing process), but recent tests reported on the net have not indicated any difference.
- Shake to mix the yeast well.**
- Add water to bring the solution up to 3/4 of the bottle.
- Add 1 to 2 cups of sugar and shake well. The amount of yeast and sugar will determine the rate and duration of CO2 generation. More yeast will result in stronger CO2 production, but will exhaust the sugar quicker. Using 1/4 teaspoon of yeast and 2 cups of sugar will result in CO2 production for about 4 to 5 weeks.
- In areas with soft water, some people recommend adding a teaspoon of baking soda to buffer the water and extend the life of the solution (prevent the acid formed by the brewing action from destroying the yeast prematurely).
Powerhead Filter
This DIY powerhead filter is a cheap, simple, yet effective filter that requires little time to make and only basic skills to build.
This DIY powerhead filter is a cheap, simple, yet effective filter that requires little time to make and only basic skills to build.
Parts Needed 1 size 0(1/2 cup) tupperware container 1 piece of filter media (pillow batting works great) 1 rubberband 1 powerhead | Tools Needed 1 Cordless Drill 1 5/8 inch wood bore drill bit 1 3/16 inch drill bit 1 pair of scissors | |
 | ||
The first thing to do is drill your holes in your container. For this you will need the body of your container, your cordless drill and a 3/16 inch drill bit. There is no set pattern for
 drilling these holes just make sure you drill a lot of them in the container. I would recommend drilling as many holes as you can without any two holes overlapping but, not to many that you weaken the container to the point that it could collapse while in use. Drill your holes on the bottom and around the sides, just make sure you don't drill any holes in the rim of the container as you will still need to put the cover on it before you are finished.
The second step is to drill a hole in the cover of your container. For this you will need the cover, your drill, and a 5/8 inch wood bore drill bit(your size may vary depending on the size
 of the intake on your powerhead. To find out the size you need, measure the opening of the intake of the powerhead and use the closest size drill bit to it. You want a snug fit so, make sure you don't use a bit that is larger then the intake opening.) To drill the hole all you have to do is find the center of the cover and drill it. In the center of the cover there is a indentation in the plastic so, just line it up there and you will have a perfectly centered hole.
 The third step is to add your filter media. For this you will need the filter media, your scissors, and a rubberband.(A note about the filter media. I have found that batting works best for this. A fabric store is a good place to buy it. If you have a piece of filter media from a whisper or something like that, just take it with you to the fabric store and buy the batting that is closest in consistency to it. You should be able to buy it by the yard, which is very cheap.) First, cut a piece of media that is at least large enough to cover the bottom and sides up to the rim of the container. Second, put your rubberband around the container as close to the rim as you can get it. Third, cut the excess media from the container. Well, your almost done, all you have left to do is put the cover on the container and slide it over the intake of your powerhead. Now you have a cheap, efficient and easy to build filter that you built youself. Enjoy!!! □
- Cut a bunch of pieces of filter media at one time.
- Make a second filter so you always have a clean one ready to go.
- Put charcoal inside the container for added filtration. Make sure you put some sort of screen over the intake to prevent charcoal from getting into the powerhead.
- When removing the filter place a sandwich bag over it to prevent waste from getting all over your tank.
Sponge Filter
Got another do-it-yourself tip for all you thrifty folks out there. These plans for making your own sponge filters is great for adding a couple of filters to a nursery tank, a quarantine tank, or even your main tank. Let�s get started!
For our sponge, we�re going to use open cell foam. These can be purchased for pennies at just about any fabric or hobby store. Using sharp scissors or knife, cut the foam into the shape of your choice. I prefer triangles as pictured below. You could make blocks, cylinders, triangles, or just about any shape you like or need. That�s the beauty of this project � custom design for less. If you use a knife to cut the foam, cut it in one direction without applying much pressure. If you try to saw it, going back and forth, you�ll end up tearing the foam.
 |
For the next step, we�ll need a sealable plastic container, such as Tupperware. The piece of foam will need to fit without being scrunched, but should be as close a fit as possible. Place the sponge in the container and then fill it with water. Before sealing the lid on tight, we need to be sure to get all the air out of the foam. Once we do this we�re ready to seal that lid and put the container in the freezer.
After the foam freezes, we can remove it from the freezer. Immediately drill a hole into the top of the foam with a power drill using a drill bit slightly smaller than the tubing we plan to use. Don�t drill all the way through the sponge, just about half way. It�s also important that we only pull one piece of foam out of the freezer at a time, otherwise they will defrost on us before we can drill them, which will cause the drill to catch and tear the foam instead of cutting it.
My personal favorite adaptation of this DIY sponge filter is to use undergravel lift tubes (see picture above). These work great for nursery or fry tanks. All you need is the foam, this article, the lift tubes, and an air pump. The combined cost of these materials is far cheaper than a power filter and just as effective. The foam could also be used to create a sponge filter that would connect to a submersible pump. Attach tubing (perforated by your drill) to the submersible pump and then insert it into the sponge to create a powerful sponge filter, similar to those used in all of my tanks for my undergravel jets.
DIY - Python Gravel Cleaner
I purchased most of the needed parts at Walmart and Lowe�s
1. Waterbed Fill & Drain Kit (WalMart $4.96)
2. 50 foot Garden Hose (Lowe�s Swan Fairlawn $7.95)
3. Shut off Valve (Lowe�s $3.99)
4. Female hose end 3/8�- 1 /2� (Lowe�s $1.77)
5. Gravel Cleaner (came with my HOT Magnum PRO)
Step Two: Putting it together
1. Install necessary adapters that come with Waterbed fill and drain kit. Install Waterbed fill and drain kit (see picture 1)
2. Attach Garden hose to Fill and Drain kit (see picture 2)
3. Attach shut off valve to other end of hose (see picture 3)
4. Install Female hose end to end of gravel cleaner hose (see picture 4a and 4b)
5. Attach Female hose end to end of shut off valve (see picture 5)
Step Three: Using the DIY Python to clean and drain tank
Make sure that your shut off valve is off before turning on the water. On the bottom of the fill and drain kit there is a valve that must be turned down to allow for suction. Turn it down and slowly turn water on checking for leaks. If there is a leak, tighten the fitting, if not turn the water on all the way.
Put the gravel cleaner in the tank and slowly turn on the shut off valve, it will sputter some at first. Adjust the shut off valve so that it lifts up the dirt from the gravel, but doesn�t suck up the gravel the whole way. Continue cleaning the gravel until you remove the desired amount of water from your tank.
Shut off the valve and remove the cleaner from the tank, holding it straight up in air, turn the valve back on to finish sucking the water the rest of the way from the hose.
Turn the water off on the faucet.
Step Four: Filling the tank with your DIY Python
Make sure that your shut off valve is off before turning on the water. Turn the water on and adjust the temperature to match that of your tank (a thermometer works well here). Turn the valve at the bottom of the fill and drain kit clockwise until it goes up tight. That will redirect the water to the hose. Holding the gravel cleaner in the sink, slowly turn the shut off valve on till you rinse the hose out really well. (NOTE: Several people on the forum have advised against using a regular garden hose for filling a tank, but I contacted the manufacturer of my hose and they informed me that as long as you rinse the hose really well, no chemicals will be released into the tank. Also make sure you use a new hose, and do not use this hose for anything else, and store it in a cool dry place to keep any bacteria from forming in it)
After the hose is rinsed turn off the shutoff valve and go back to your tank. I add all the additives (Novaqua and buffers) that I am going to use in a cup of water and slowly add these to the tank as I refill. Turn the water on slow and let the tank refill to the desired level.
Once the tank is full, turn off the shut off valve, and turn the valve on the bottom of the fill and drain kit back to suction. Turn the shut off valve back on and remove all the water from your hose.
Hope this all makes sense to you and good luck with your DIY project
Total cost $18.67 compared to Python about $40 for a 50 footer. □
| PIC 1 | PIC 2 | |
 |  | |
| PIC 3 | PIC 4a | |
 |  | |
| PIC 4b | PIC 5 | |
 |  | |
I have built an automatic water changer for my 225 gallon African Cichlid tank. Many of the ideas I have used are based on Featherfinfan's design. The main difference being that my water contains chloramines and therefore I cannot filter it out as you can with chlorine. The design is actually very simple and yet effective.
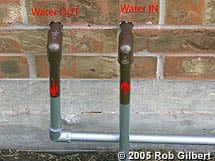 |  | |
| Water OUT / Water IN | Ball valves to each return pump | |
The first step was to get water into my house under the tank. I already had a PVC water line running along the outside wall behind the tank. I ran this line to do my manual water changes prior to deciding to do an automatic system. The water source is T-ed off of my sprinkler system that supplies from a separate water meter from the rest of my house. I am not charged sewage on this water supply. So, I tapped off of this line and ran it through the wall and under the tank. Once under the tank I installed a ball valve and reduced to �" tubing after the valve. This tubing was run directly into one of my return pumps in my sump. I later modified this to have a tee in the tubing and have two water supplies each with its own ball valve. One goes into each return pump to more evenly distribute the incoming water. |
 |  | |
| Water outlet | Overflow in the sump | |
Next, I ran another line from the outside to under the tank for my drain line. This line goes to a bulkhead in the side of my sump that I installed for this project. I tried to calculate exactly where my water level needed to be in order to make sure I did not overflow my sump in the event of a power failure. I also had to consider the fact that my sump would drain down to this level while the power was out. Therefore the level could not be too low or my return pumps would loose suction after starting back up. I missed slightly so I installed a nipple with an elbow on the inside of the sump so that I could adjust the level precisely. If you're going to miss, do it on the low side. Installing a nipple with an elbow on the inside of the bulkhead is very easy. If you miss the other way you are out of luck and will have to plug the hole and drill again. My drain line runs out into my yard. I dug a hole at the end of the drain line and filled it with gravel to allow water to soak into the ground rather than making a soggy mess in one spot. |
 |  | |
| Water inlet | Pump inlet | |
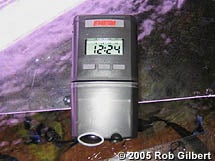
So, I have water in and water out. What about the chloramines? Initially I was dosing my water with the Kent Aquadose. I diluted Prime (Seachem says this is OK to do) to about 1 part Prime and 4 parts water and set the doser as best I could. My goal was to dose for about twice more than the amount of new water being added. The only problem I had was that at this low flow rate the Aquadoser was very inconsistent and I am very impatient. I am sure it would be great for other applications but for this it was just too hard to adjust and I never felt safe about my water quality. After all I am doing this to help the fish not hurt them. So after searching around I came across the Eheim Liquidose. I quickly ordered one online from Petsmart so that if I did not like it I could return it locally. It is designed to dose liquid fertilizer for aquarium plants. But I figured if it doses liquid it doses liquid. Brilliant huh! The Eheim can dose 1 ml from 1 to 8 times a day. Its liquid reservoir holds 80 ml of which 50ml can be used by the device before going below the minimum level mark. Currently I am dosing 5ml of 100% prime a day and changing about 25-30 gallons of water per day. The doser just sits on my hood hanging over the water in the tank. So far I have not had any positive readings for chlorine or chloramines. I also installed an Ammonia Alert by Seachem that will only detect free (read toxic) ammonia. This was done because once the chloramines are broken down by Prime the ammonia part of them is still left in the water. Prime will detoxify this ammonia until it can be processed by the aquarium bio filter but I wanted to make sure that I am adding enough Prime. I was not sure about the Ammonia Alert but I tested it over a bottle of Windex and it gave a reading almost instantaneously. It has not detected any ammonia in the tank water yet. |
 |  | |
| Screen on water outlet | Eheim Doser | |